Friday, April 8, 2016

Houndstooth Quilt Pattern - Part 3


Here is another variation on the Housndtooth Quilt pattern that I made. This one was a gift for a good friend's new baby. The baby is due any day now and they are decorating his nursery in black and white prints with a few pops of blue and yellow mixed in. These are going to be some of the trendiest parents I know so their baby's quilt had to be something special! Obviously I changed the number of blocks from the original size which means you can also adjust the amount of fabric yardage from the original pattern. I didn't actually calculate the amount I used but may do that if there's enough interest.

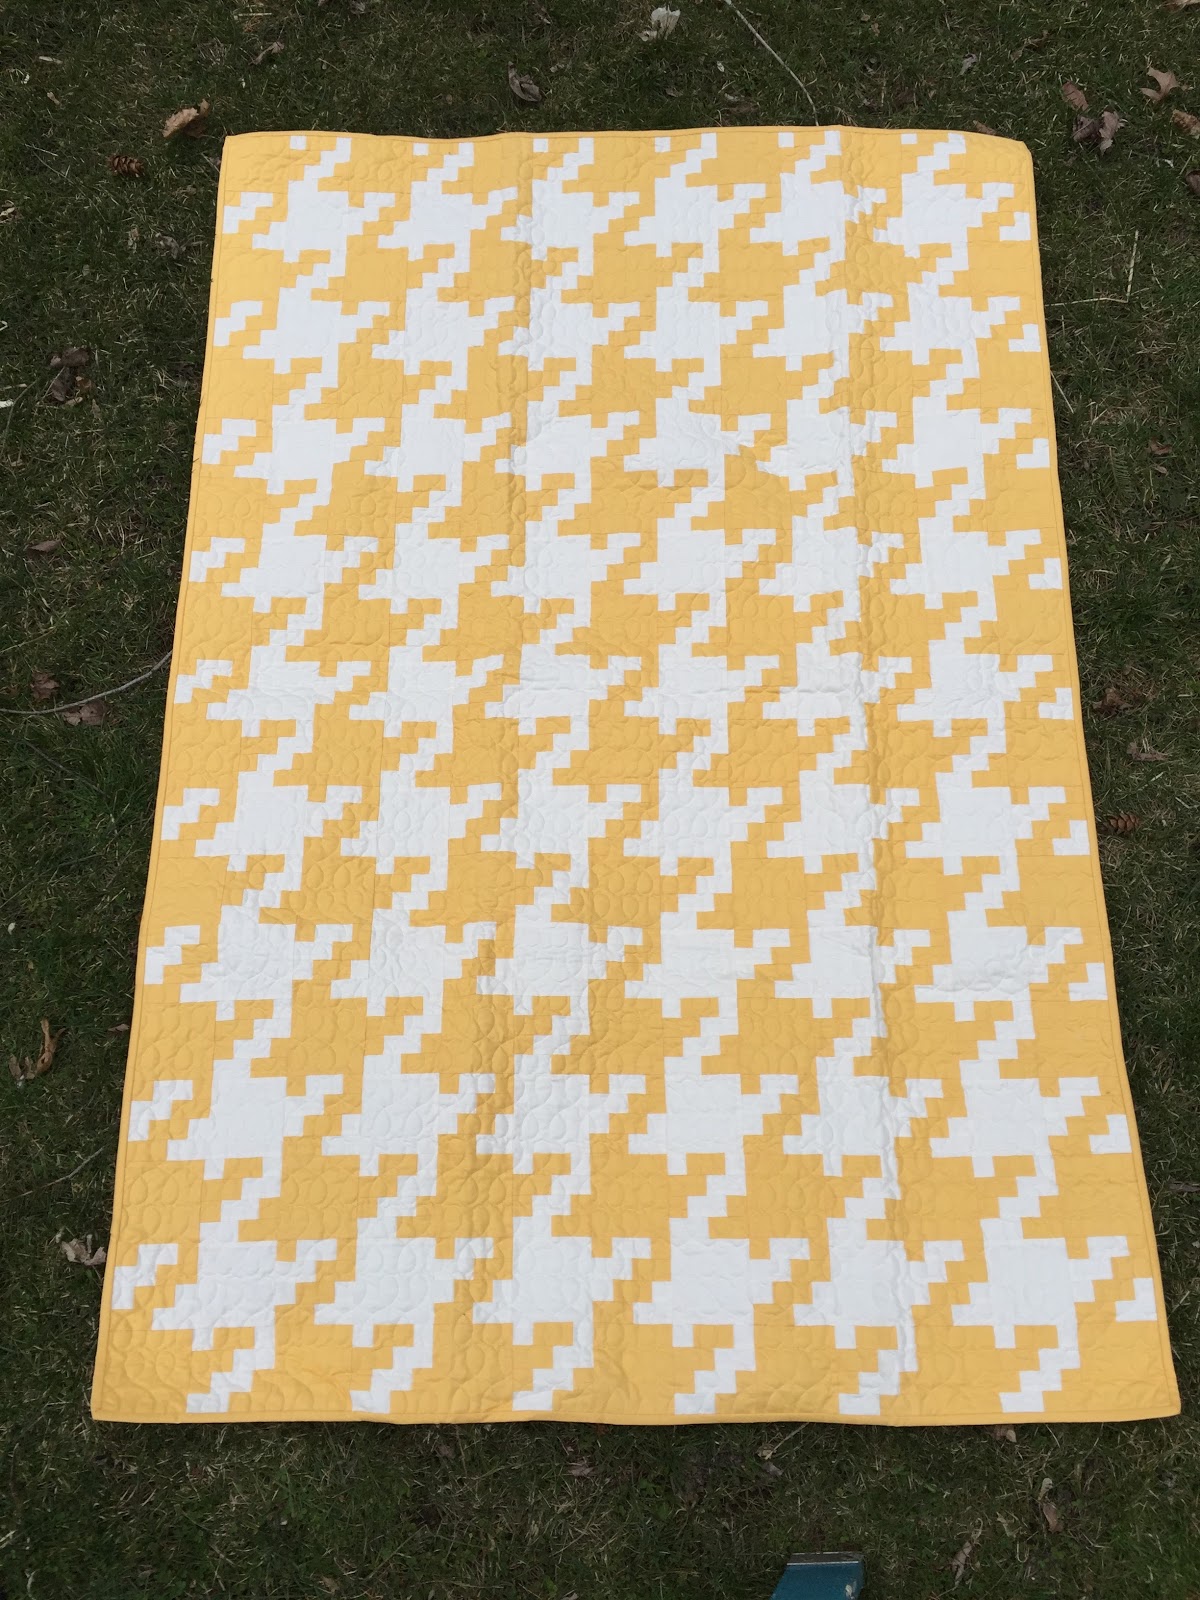
Here's a pic from the back:


I ordered the backing from Spoonflower. I knew they were getting these crib sheets from Land of Nod so I wanted to coordinate with those. By the time the fabric arrived from Spoonflower I was in a bit of a time crunch to finish this quilt so my only frustration here was that the white from the front of my quilt is a crisp white and the background on the cloud fabric is sort of creamy. As a perfectionist this bugs me but it was too late to come up with another plan. As much as I appreciate the ability to order fabrics online it does add the challenge of not being able to match things as perfectly as you could when shopping in person.
Hope you enjoy the Houndstooth Quilts I've made so far. I'm sure there will be more to post in the future! Please comment with any questions. Thanks for looking!


Friday, March 25, 2016

Grandma's Kitchen (Houndstooth Quilt Pattern) Part 2

I wanted to share the story of where the name for my Houndstooth quilt pattern came from. This was the first quilt I made from this pattern:


When I first thought about this design, I always pictured it in Yellow and White. I wasn't sure why but that was how I pictured it. A few months after I started this quilt, I was flipping through some old pictures and came across this gem:


This is (roughly) circa 1985 and it's a picture of me with my Grandma and Mom in, of all places, my Grandma's Kitchen! And will someone check out those kitchen cabinets??!! What a bright and cheery room and I LOVE that yellow and white houndstooth wallpaper on the cabinet doors!


Somewhere in the back of my mind I had this comforting image of my Grandma's Kitchen and this pattern from the cabinets was part of it. It was just such a funny and sweet memory when I came across this pic and it all flooded back. 

Here's one more pic of this version of the quilt, showing the fabric that I chose for the backing as well:

I hope this encourages you to try this great pattern and make this wonderful, cheery quilt!


Sunday, March 20, 2016

Grandma's Kitchen (aka Houndstooth)


I am a huge fan of  Houndstooth fabrics/prints and had seen designs of Houndstooth quilt patterns online recently. However, the patterns I had seen didn't really look like Houndstooth to me so I decided to design my own pattern. I have made quite a few of these myself now and love this pattern so I want to share it and make it available to anyone. All I would ask is that you please link back to this blog for any pictures or descriptions of any sort that you post online of your projects or process where you've used any part of this pattern, design or idea. Please help me to keep designing and sharing!
Now I will jump right in to the pattern and tutorial. Please comment with any questions and I will get back to you as soon as possible.

For the top of this quilt, you will need two different fabrics:

Fabric Requirements (Throw size 52" x 76"):
Light 2 1/2 yards
Dark 2 3/4 yards
Binding 5/8 yard
Backing 2 1/2 yards

Cutting:
1. From the Dark fabric cut 9- 4 1/2" x WOF strips, 15- 2 1/2" x WOF strips and 10- 1 1/2" x WOF strips.
2. Sub-cut the Dark 4 1/2" strips into 70- 4 1/2" squares

3. From the Light fabric cut 7- 4 1/2" x WOF strips, 15- 2 1/2" x WOF strips and 10- 1 1/2" x WOF strips
4. Sub-cut the Light 4 1/2" strips into 54- 4 1/2" squares

Steps:
5. Following the pictures below and using the strips you've cut, make strip sets.
6. Sew a 2 1/2" Dark strip to a 2 1/2" Light strip to make 10 Unit A strip sets.
7. Sew 1 1/2" Dark strips to both sides of a 2 1/2" Light strip to make 5 Unit B strip sets.
8. Sew 1 1/2" Light strips to both sides of a 2 1/2" Dark strip to make 5 Unit C strip sets.


Strip Set Unit C 

Strip Set Unit A
Strip Set Unit B


Follow the general rules of pressing to the darker fabric and your quilt will go together much easier!

By pressing to the darker fabric for the Unit B & C strip sets, you can layer them right sides together and they will "nestle" nicely for the next step of sub-cutting.

9. Cut all strips sets into 1 1/2" sub-cuts. You will need 246 of Unit A, 123 each from Units B & C.

Block #1

Block #2


10. Piece the blocks according to the pictures above. You will need 60 of Block #1 and 63 of Block #2. 
11. Lay out pieced blocks with 4 1/2" cut squares according to the picture making sure that each block is turned the right way. 


12. Sew together. Quilt. Bind. Enjoy!

Monday, May 5, 2014

Time to Re-Cover


I have been staring at this ugly, dirty, worn ironing board cover while working like crazy the last couple months. As a bookkeeper, this is a pretty busy time of year with taxes and all that fun stuff but now that April 15th has passed, I get a little bit of time to recover - AND Re-cover (get it? haha!)!

I have looked for a new cover for this ironing board on several occasions but it is not a standard size so they don't have them in any stores I have been to. It is a wider-width which seemed like a great choice to me at the time, especially since I never use my ironing board for clothes but only rather for pieced quilt tops. However, when looking for a replacement cover, that can be a nuisance.


Anyways, I am not an upholsterer so I wanted to find the easiest way to make this happen and, in the end, to have a nice, new functioning cover. So, here's what I did:


I literally laid my fabric on top of the ironing board and left a "bit" hanging over. Then I trimmed around the sides. I roughly calculated in my head the measurement for the "bit" by figuring that I would need enough to make casing for the rope I was going to use to cinch the cover and tie it on to the board. In this case, I decided to leave about 4" hanging down.

Next, I sewed a casing around the edge. I folded up approx 1" and then folded over another 1" and then stitched near the edge, leaving a 4" opening in the seam on one end. 


I used a piece of rope that my husband had in the garage and fed it through my casing starting and ending at the 4" opening.


Now the fun part, and I would suggest 2 people for this...


Pull the ropes and cinch up the cover on the board!


I am quite pleased with my final result. I used a remnant of decorator-weight fabric from a previous project and some old rope so even if it doesn't hold up forever, it looks nice for now and didn't cost me anything.


Since this one went so well, I kind of went a little crazy...I started looking around my craft room at all of the other things I could re-cover! 

The next victim (ahem) project, was this Ikea office chair. The cover came off years ago and after trying several times to get the original cover back on, it has sat like this for almost a year now. Still useable but very unattractive. 


And, I have another small ironing board that is very useful, but also well-loved. As you can see, it needs a new cover!


I searched through my remnants until I found just the right piece of fabric for each of these projects.


In the case of the chair, I auditioned a couple fabrics until I found just the right one.


I used the same steps as above for each of these projects and I had one very successful evening! Pretty happy that I get to use these lovely things to make many more projects. 


Friday, April 18, 2014

Sweet Skirts and Matching Outfits #1

I had a scary thought the other day: my little girl is growing up!
I keep thinking that "someday" I will make her some cute clothes for her and her dolls and Barbies. Right now she loves it when I make something for her and thinks that my taste in fabrics is great. But the day will be coming soon when she won't want to wear anything homemade or play with her dolls and I came to the realization that I need to make today that "someday"!


Here is Abby with one of her dolls all dressed in her outfit. This outfit went together very easily because it came from a marked panel by Andover Fabrics. The panels were part of a line of fabric called, Let's Play Dolls. The instructions were printed right on the panel and you just sit down, cut and sew. The only other materials needed were a bit of bias-cut seam binding (you can buy pre-made or make your own) and thread. There are 2 different panels that each have an outfit and accessories printed on them.


Then, they had coordinating fabrics on the bolt so that you could make matching outfits in girl-sizes. The skirt I made for Abby uses the pink w/ yellow polka dot fabric from that line but I found a tone-on-tone yellow chevron that I used for the lower ruffle. She's actually not a huge fan of pink so I was trying to tone that down a bit.

Since I made this outfit, I also did one for a friend's birthday party that Abby was going to as part of her gift. I made a skirt for the girl and a matching dress for her doll. It was a big hit.

The pattern for the skirt came out of a McCall's Quilting magazine. They have re-printed the same pattern several times now. I think the first time I saw it was in their Quilts and More magazine. It is a pretty simple pattern with an elastic casing for the waist and then the 2 ruffles. I have re-sized it on my own now since Abby is getting a little big for the pattern as is (and if I can re-size it with my very limited pattern reading ability - you can too!).


Hope you get inspired to make some things of your own!

Monday, February 17, 2014

Alphabet Banner--Part II: Open Buttonhole Filler

For almost a year now I've worked on the alphabet banner for my son.  Not consistently, of course, but when I do watch out!!!  Unfortunately, at the rate I'm going Sebastian will be in high school by the time I finish.  Oh well... I'll save it for my grandkids!  Actually the banner is a pretty simple project.  My inspiration came from the various alphabet books and flash cards I use with my son.  Many of the letters were represented by simple objects or animals like elephants, owls, and cars.  Although I've never been one to attempt applique, the vivid imagery was too enticing to pass up.  I designed the letters freehand but the pictures were based on Ed Emberley's drawing techniques.  He uses simple shapes to create boldly graphic designs.  He has a series of "how to" drawing books that really takes the mystique out of drawing.


The sewing material I used were several old sweaters I recycled; however, you could use regular felted wool which is easier to work with because it's not as thick as recycled sweaters.  I used Aurifil wool thread to stitch my applique pieces and various other threads to embroider and embellish.  In a pervious post about this banner I included pictures of a couple of blocks I had completed but I didn't elaborate on the block embellishments.  Well, I wish to correct that mistake and talk about them now!

The problem with talking about embroidery stitches is, depending on what source material you use, one stitch may go by a multitude of different titles.  I never really thought about it before now because I normally don't think about the name of a stitch.  I based my use of certain stitches on their looks rather than what they were called and if I needed to locate a certain stitch, well again, I looked at the pictures of my embroidery books rather than rely on assigned names.  Titles only become a problem when you need to compile a list or try to explain how to do certain stitches.  This was the situation confronting me while trying to put this post together.  A prime example of this particular quandary is the open buttonhole filler stitch, a.k.a. the net stitch, a.k.a. the detached buttonhole stitch.  All three pretty much refer to the same thing, except the detached buttonhole is similar but very different from the other two; however, I chose it because it was the only representation I could find on the internet.  Here are some examples of this elusive stitch.


This is a detail of the "A for alligator" block.  I use the open buttonhole filler to simulate the animal's scales.  I used a no. 8 pearl cotton thread.

The example below is a close up of the "N for nectarine" block.  While I used the same stitch I had a completely different purpose.  I needed to add texture and color to an otherwise boring block.


Instructions for this stitch are available in two books:  Creative Stitching by Sue Spargo (open buttonhole), and Embroidery & Crazy Quilt Stitch Tool by Judith Baker Montano (net stitch).  If you're not interested in acquiring a book you could also look at Sharon B's Dictionary of Stitches website (detached buttonhole).


I particularly liked this stitch because once the anchor row is established the rest goes pretty quickly.  Little effort for a BIG effect!  It's funny because it has less to do with embroidery and feels more like crochet or something similar.  Of course there are other stitches represented through out each block but I think I'll save that for another day...

Happy stitching!!!!

Friday, January 17, 2014

Alabama Chanin Dress: Done at Last!

Good Morning Dear Readers,

I finally completed my Alabama Chanin inspired dress!


Although I'm posting this rather late the dress actually didn't take as long as I thought it would.  I wrote the first post in July and I finished the dress in September.  It truly was a labor of love and it was wonderful learning new skills, including stenciling and reverse applique.  I also discovered new appreciation for the control hand sewing affords; however, the best part was the dress fits like a dream!  Ms. Chanin sure does know how to draft a flattering dress pattern. 

I would like to thank my mother-in-law for the fabulous accessories (i.e. necklace and earrings).  I'll never wear this dress without them again!

Happy sewing everyone!