Showing posts with label applique. Show all posts

Monday, February 17, 2014

Alphabet Banner--Part II: Open Buttonhole Filler

For almost a year now I've worked on the alphabet banner for my son.  Not consistently, of course, but when I do watch out!!!  Unfortunately, at the rate I'm going Sebastian will be in high school by the time I finish.  Oh well... I'll save it for my grandkids!  Actually the banner is a pretty simple project.  My inspiration came from the various alphabet books and flash cards I use with my son.  Many of the letters were represented by simple objects or animals like elephants, owls, and cars.  Although I've never been one to attempt applique, the vivid imagery was too enticing to pass up.  I designed the letters freehand but the pictures were based on Ed Emberley's drawing techniques.  He uses simple shapes to create boldly graphic designs.  He has a series of "how to" drawing books that really takes the mystique out of drawing.


The sewing material I used were several old sweaters I recycled; however, you could use regular felted wool which is easier to work with because it's not as thick as recycled sweaters.  I used Aurifil wool thread to stitch my applique pieces and various other threads to embroider and embellish.  In a pervious post about this banner I included pictures of a couple of blocks I had completed but I didn't elaborate on the block embellishments.  Well, I wish to correct that mistake and talk about them now!

The problem with talking about embroidery stitches is, depending on what source material you use, one stitch may go by a multitude of different titles.  I never really thought about it before now because I normally don't think about the name of a stitch.  I based my use of certain stitches on their looks rather than what they were called and if I needed to locate a certain stitch, well again, I looked at the pictures of my embroidery books rather than rely on assigned names.  Titles only become a problem when you need to compile a list or try to explain how to do certain stitches.  This was the situation confronting me while trying to put this post together.  A prime example of this particular quandary is the open buttonhole filler stitch, a.k.a. the net stitch, a.k.a. the detached buttonhole stitch.  All three pretty much refer to the same thing, except the detached buttonhole is similar but very different from the other two; however, I chose it because it was the only representation I could find on the internet.  Here are some examples of this elusive stitch.


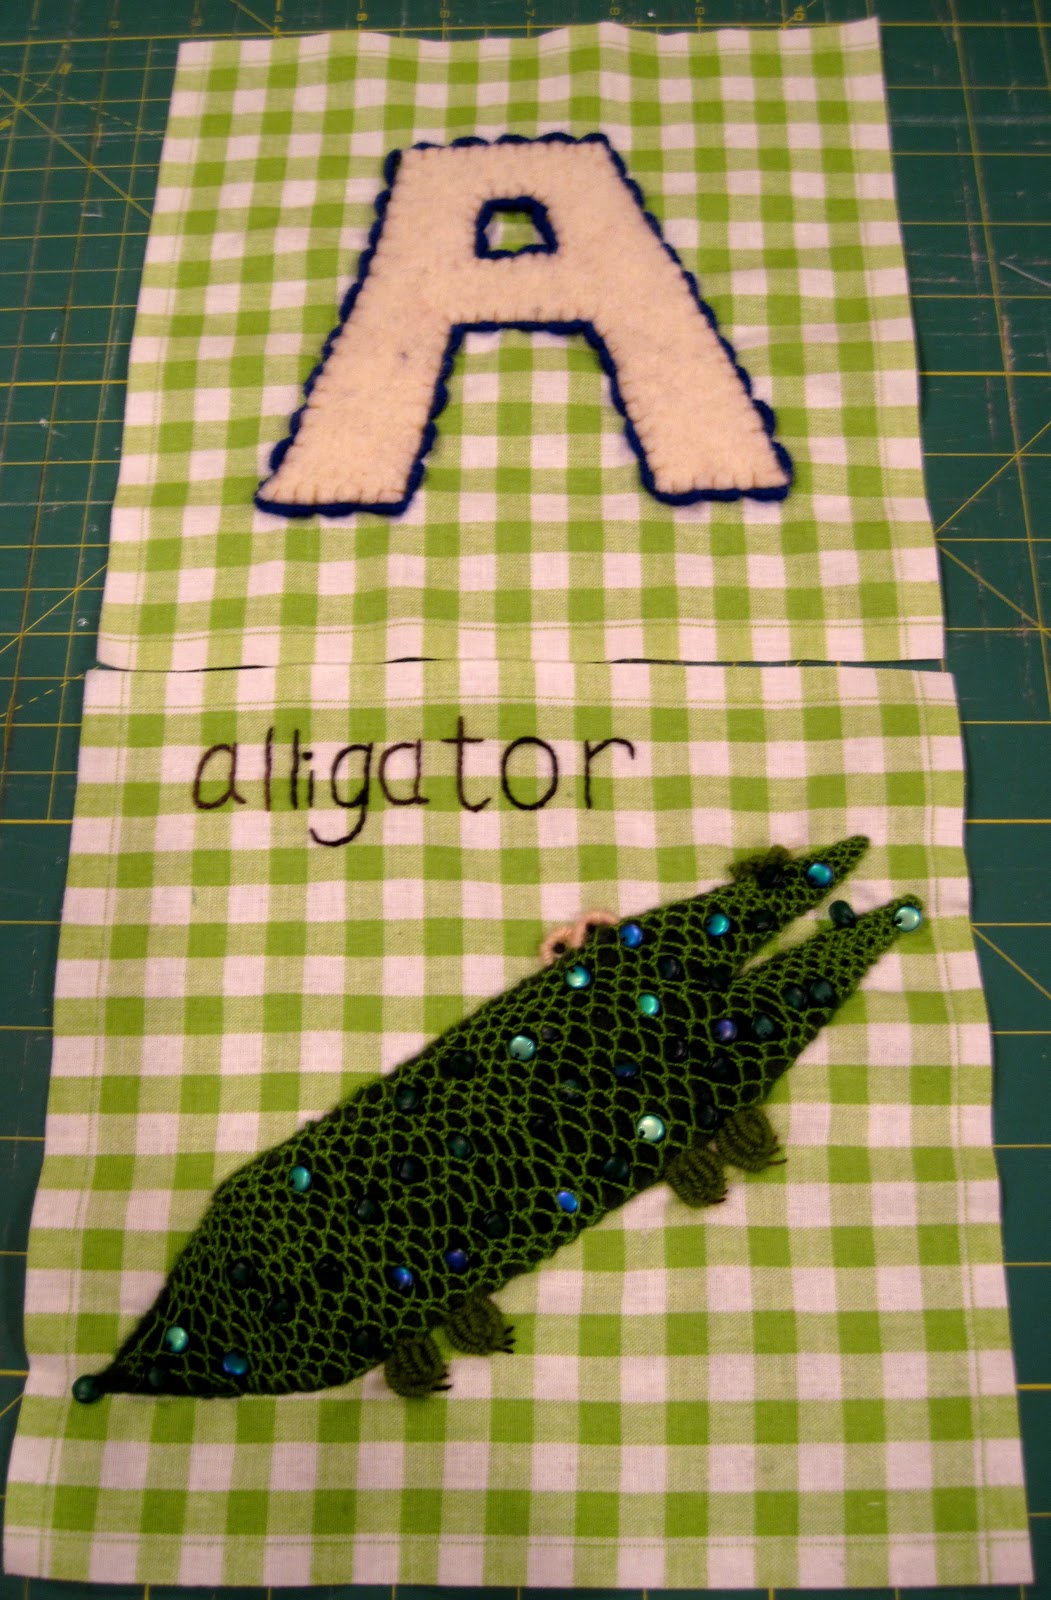
This is a detail of the "A for alligator" block.  I use the open buttonhole filler to simulate the animal's scales.  I used a no. 8 pearl cotton thread.

The example below is a close up of the "N for nectarine" block.  While I used the same stitch I had a completely different purpose.  I needed to add texture and color to an otherwise boring block.


Instructions for this stitch are available in two books:  Creative Stitching by Sue Spargo (open buttonhole), and Embroidery & Crazy Quilt Stitch Tool by Judith Baker Montano (net stitch).  If you're not interested in acquiring a book you could also look at Sharon B's Dictionary of Stitches website (detached buttonhole).


I particularly liked this stitch because once the anchor row is established the rest goes pretty quickly.  Little effort for a BIG effect!  It's funny because it has less to do with embroidery and feels more like crochet or something similar.  Of course there are other stitches represented through out each block but I think I'll save that for another day...

Happy stitching!!!!

Tuesday, April 16, 2013

A Banner for Sebastian - Part One


As you all know by now I've never been to strictly play by the rules when it comes to my work.  I like to mix things up and use non-traditional materials for various reasons.  Sometimes it's to save money (most times really) and other times for convenience, and then there are the times I happen to come across something that combines the two.  One such product came my way not too long ago when I was out shopping with my mother.  I was in one of my favorite stores, Anthropologie, in the sales area.  In one of the accessory bins was a few rolls of cloth.  I took a closer look and realized they were disposable cloth napkins.  They were on sale for a price I could not resist!  I knew the moment I saw them I would use them for some sort of quilt project.  I mean how could I not?!  They were perfectly square with finished edges and twenty on a roll!

Once I got home I wanted to find out a little more about the company behind my new napkins and what other products they offered.  What I found was very interesting.  Mydrap originated in Spain as a family owned textile business; however, in the 1990s the industry lost momentum and it was necessary to move in a different direction.  That's when the idea of producing linens for the hospitality industry was pursued.  From there they expanded to included common households and the consumer market.  They carry various sized napkins and placemats in 20 different colors and 5 patterns.  Each napkin and placemat is a perforated 100% cotton piece of fabric (or linen).  Here's what they look like:


As you can see they really are practically ideal for quilting and crafting.  Especially for people with arthritis or other hand issues.  Plus they limit cutting time since the napkins are perfectly square.  They come in beautiful bold colors and are very easy to work with.

Here's how I've been using them:


These are panels from the alphabet banner I'm making for my son's (Sebastian) bedroom.  Each panel is made from a Mydrap luncheon napkin.  I did not have to prep (like adding interfacing) and I will not have to do anything to the edges to finish them off because they are designed not to unravel.  They really are just a great product!


Make sure to check them out at their website where you can purchase individual rolls or buy wholesale.  You can also use the store locator to find stores near you that carry Mydrap.  Most napkin rolls come in a package of 20 and depending on their size the prices range from $27 to $44 (reflects linen placemats).  The cotton cocktail napkins are a pretty good deal since they come 50 to a roll for $27 and are sized 4.3" x 4.3".

I'm really just crazy about this product!  Now, if only I could get them to make quilting fabric on a roll in standard quilting sizes (4.5"x 4.5", 6.5"x 6.5", etc.)...  One can dream!

Keep checking back for more about this really fun and surprisingly easy alphabet banner!

Till then, happy crafting!